| Issue | Primary Cause | Quick Fix |
|---|---|---|
| Rapid CMOS Battery Drain | Jumper left in “Clear” position | Move jumper to “Normal” pins (1-2) |
| BIOS Settings Resetting | Short circuit in CMOS path | Clean header pins with isopropyl alcohol |
| System Boot Failure | Depleted CR2032 battery | Replace battery after resetting jumper |
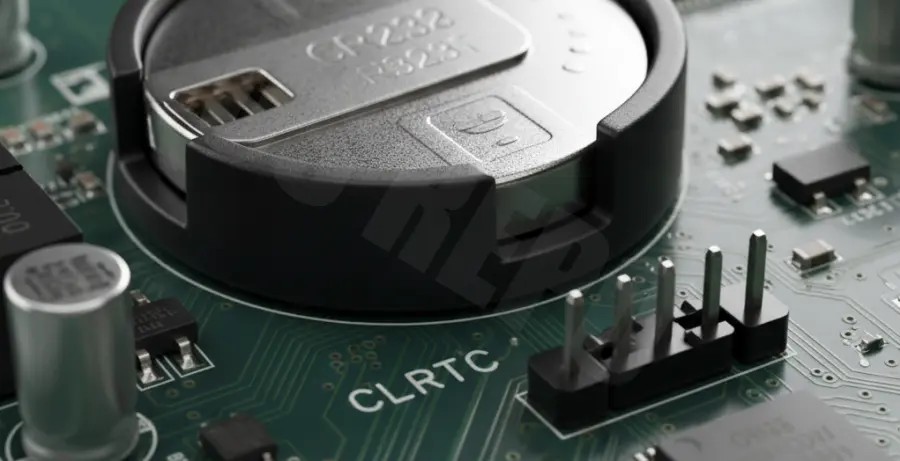
What is Clear CMOS Jumper Causing Battery Drain?
The CMOS jumper is a small plastic bridge on your motherboard that connects two of three pins. Its primary job is to maintain or clear the BIOS configuration stored in the CMOS memory.
Under normal operation, the jumper sits on pins 1 and 2. This completes the circuit that allows the CR2032 battery to power the CMOS chip while the PC is off.
When you move the jumper to the “Clear” position (usually pins 2 and 3), it shorts the CMOS memory to ground. This wipes the settings.
If the jumper is accidentally left in the “Clear” position or if there is debris bridging these pins, it creates a continuous electrical drain. This can kill a fresh battery in days or even hours.
Step-by-Step Solutions
1. Verify Jumper Position
Most motherboards have a 3-pin header labeled CLRTC, JBAT1, or CCMOS. Identify the “Normal” vs “Clear” positions in your manual.
If your jumper is on the wrong pins, the battery is being forced to discharge constantly. Move the jumper back to the default position (usually pins 1-2).
2. Clean the CMOS Header Pins
Dust or conductive thermal paste can bridge the gap between the CMOS pins. This creates a high-resistance short that slowly siphons power from the battery.
Use a can of compressed air or a soft brush with 99% isopropyl alcohol to clean the area.
# Typical Motherboard Jumper Labels to look for:
# CLRTC (ASUS)
# JBAT1 (MSI)
# CLR_CMOS (Gigabyte)
# PASSWD (Password/CMOS Reset)
3. Test for Motherboard Short Circuits
In some cases, a failing diode or capacitor near the CMOS battery socket is the culprit. If the battery drains even when the jumper is removed entirely, the motherboard may have a hardware defect.
Try removing the jumper completely (if your motherboard supports it) to see if the drain persists. Note that some boards require the jumper to be on 1-2 to boot at all.
4. Perform a Cold Reset
Sometimes the BIOS state gets “stuck” in a high-power draw mode. To fix this, perform a complete power cycle:
Remove the battery and move the jumper to the “Clear” position for 60 seconds. Move the jumper back to “Normal,” insert a brand-new CR2032 battery, and plug the PC back into the wall.
5. Inspect the Battery Housing
Ensure the metal tabs inside the CR2032 coin cell holder are not bent. If the side contact is touching the bottom contact, it creates a direct short.
Gently bend the side tab inward to ensure a tight, clean connection with the edge of the battery without touching the base of the socket.